This feature is only available for kilometric and geographic grids drawing.
You first have to define where ticks marks have to be created:
Check the corresponding option.
Then you have defined the position of ticks marks in relation to the frame (if you have not selected the frame option this position is calculated to the rectangle defined to limit the grid drawing).
Adjust to insertion rectangle : This option available in extraction mode allows to limit tick marks creation to the insertion rectangle and drop them automatically on the insertion rectangle border. As an example this option can be used to adjust tick marks on a frame especially when extractions sizes are different from a page to another. To do so just tick the button "Adjust to insertion rectangle".
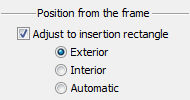
An automatic mode appears as a complement to the Exterior or Interior modes.
In Automatic mode tick marks length are automatically adjusted between extraction and insertion zone. |
|
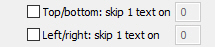
You can choose apply a "skip text" parameter :
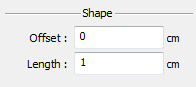
Enter the length of tick marks (in centimeters) and the offset from the frame.
The offset is calculated using the "Position from the frame" option:
If you have chosen to create tick marks at the interior part of the frame tick marks are shifted inside the frame.
If you have chosen to create tick marks at the exterior part of the frame tick marks are shifted outside the frame.
In automatic mode the parameters Offset and Insertion Offset allows to move tick marks from the extraction or insertion borders. Tick marks length is then automatically adapted to these parameters.
Offset : move tick marks from the extraction border.
Insertion offset : move tick marks from the insertion border.
You can also create intermediate tick marks. These intermediate tick marks are created between two main tick marks:
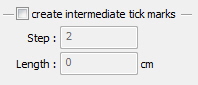
Check the box to activate this option.
You then have to define two parameters:
Step: this the number of steps between to main tick marks. For example if you enter 5 steps it means that 4 intermediate tick marks are created.
Length: enter the length of tick marks (in centimeters). Intermediate tick marks use the same offset and position parameters you defined for the main tick marks.
Click  button.
You can define a representation indicating the direction of tick marks texts.
If you choose the "No representation" option no text is added to the coordinates.
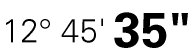
If you choose the "Placed before" option the text you enter in the corresponding text box is added and placed before the coordinates when the program writes these coordinates:
East 3°54'25"
If you choose the "Placed after" option the text you enter in the corresponding text box is added and placed after the coordinates when the program writes these coordinates.
3°54'25" East
You can define a representation indicating the direction of tick marks texts.
If you choose the "No representation" option no text is added to the coordinates.
If you choose the "Placed before" option the text you enter in the corresponding text box is added and placed before the coordinates when the program writes these coordinates:
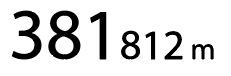
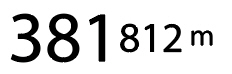
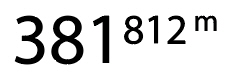
East 280km
If you choose the "Placed after" option the text you enter in the corresponding text box is added and placed after the coordinates when the program writes these coordinates.
280km East
If you check "Use equator as sign reference" or "Greenwich as sign reference" signs are placed using these references as a zero value.
Click button.
There are two ways to define the aspect of tick marks:
Check "Standard" option and click [Parameters...].
This panel is identical as the one you use to define "Generic curves". Please refer to the corresponding chapter to get more details.
Check "Type" option. The list of available curve types in the file is displayed.
Select in the list the type of curve you want to associate to the tick marks. The list of the types is the one of the file.
Tick marks become typed curves with all its capabilities concerning graphical aspect.
Once you finished to define the aspect of
the tick marks, click button.
You can then define which values you want to use to write the texts of the tick marks, the number of digits and the characters you want to use to represent the used unit:
In the previous example, we have chosen to represent degrees and minutes, respectively associated to [°] and ['] symbols.
Enter the characters for the unit (you can leave a blank field) and choose the number of digits using the pop-up menu.
Choose the unit you want to use to write coordinates (meters, ten of meters, hundreds of meters, kilometers, ten of kilometers, hundreds of kilometers, yard, miles or nautical miles).
You can then choose the number of digits using the pop-up menu. This number is calculated starting from the right part of the text. The maximum number of digits depends of the chosen unit.
Example using "Meters" unit:
7 digits: 1275250
5 digits: 75250
4 digits: 5250
In order to make alignment of tick marks easy, you can add a filling character. Check [Fixed length] box. Filling character field becomes available. By default, when checked, filling character is 0.
Click button.
There are two ways to define the text aspect of tick marks:
Check "Standard" option and click [Parameters...].
This panel is identical as the one you use to define "Generic texts". Please refer to the corresponding chapter to get more details.
Check "Type" option. The list of available text types in the file is displayed.
Select in the list the type of text you want to associate to the tick marks. The list of types is the one of the file.
Tick marks become typed texts with all its capabilities concerning graphical aspect.
Note: no text is placed on intermediate tick marks.
Once you finished to define the aspect of
the tick marks click button.
If you have chosen to use a text type to write tick marks texts the following panel is displayed. If you have chosen to use generic texts (no text type) you have no access to these options.
These options allow you to define a font changing in order to make the difference between two parts of a tick mark text.
If you do not want to use this feature you just have to deactivate "Split
the text in two parts" option. All others options are then disabled
and you have to click to go
to next step.
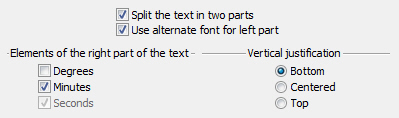
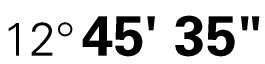
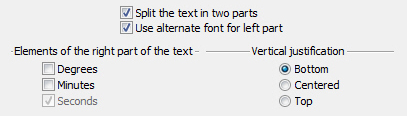
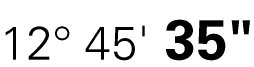
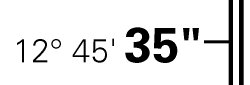
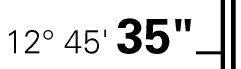
Activate "Split the text in two parts" option. This will divide the tick marks texts in two parts: the right and the left part. In this case you have to choose between placing this separation after the "Degrees" value or the "Minutes" value.
If you activate the "Use alternate font for left part" option texts considered placed in the left part will use the alternate font defined in the text type.
Example:
Two examples of parameters and their result:
|
|
|
|
|
|
|
|
|
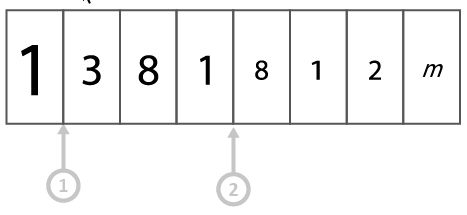
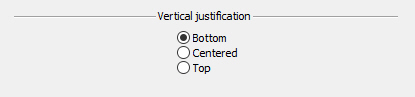
The vertical justification defines the position of the smallest text according to the largest one:
Bottom |
|
|
|
|
|
Centered |
|
|
|
|
|
Top |
|
|
These values are used to add an additional gap between the text.
The effect depends of the option you choose in the "Placement of all tick marks texts parallel to the frame" panel (please see below):
"centered on the font shift": the left and right value are applied on each side of the tick mark.
other options: both value are added to the texts.
All parameters are the same except the one which defines how to split the text in two or three parts. In theses cases it has the following panel:
Example 1 :
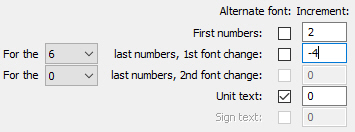

First numbers : Main font / Increment 2
First change on 6 last numbers / increment -4
Alternate font for Unit text / Increment 0
Example 2 :
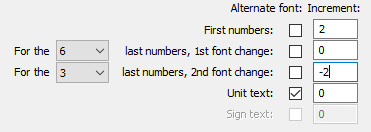
First numbers : Main font / Increment 2
First change on 6 last numbers : Main font / increment 0 (modification will not be activated for the last 3 numbers because a second change has been defined)
Second change on 3 last numbers : Main font / increment -2
Alternate font for Unit text / Increment 0
The vertical justification defines the position of the smallest text according to the largest one:
Bottom |
|
|
|
|
|
Centered |
|
|
|
|
|
Top |
|
|
The program uses the standard height of a letter for defining the justification when using the font shift. Sometimes this information is missing in the font definition itself. You can use this part of the panel to manually define this value (in point).

Click button.
The first panel allows to choose the orientation of the texts.
Once the orientation chosen an adjustment is necessary to place the text correctly.
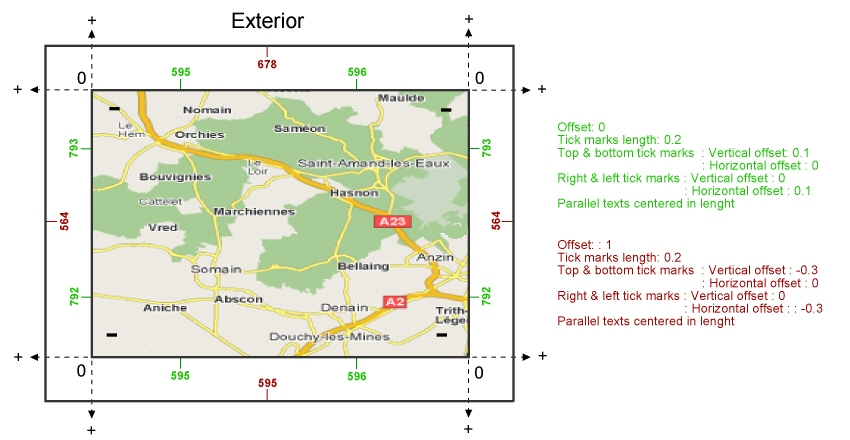
The offset parameters (horizontal and vertical) allows to move the text precisely from the tick marks.
Horizontal offset from the tick mark: horizontal offset from the extremity of the tick marks. This value takes in account the justification.
Vertical offset from the tick mark: vertical offset from the extremity of the tick marks.
If the grid is defined as "exterior" a positive value moves the text outside the frame, on the opposite a negative value brings back the text inside.
If the grid is defined as "interior" a positive value brings back the text inside the frame, on the opposite a negative value moves the text outside.
NOTE: If the mode is as "exterior" and tick marks are shifted outside the frame it is necessary to enter negative values if you want to move the texts under the tick marks.
For your information:
For texts placed on top of the frame positioning is made according to the baseline of the texts.
For texts placed on the bottom of the frame positioning is made according to the top of the texts.
So if a text is placed outside from the tick marks the offset value corresponds to the real distance between texts and tick marks.
On the opposite, if a text is placed inside from the tick marks it is needed to include in the offset value the font size in order to place the texts correctly.
Example :
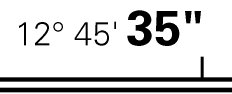
On the left: Last letter fits the tick mark. |
|
|
|
|
|
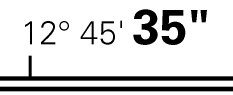
On the right: First letter fits the tick mark. |
|
|
|
|
|
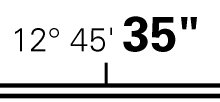
Centered in length: The text is placed so that its center fits the tick mark. |
|
|
|
|
|
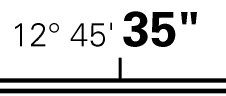
If the option "Split the text in two parts" is ticked it is also possible to center the texts on the font shift. Centered on the font shift: The text is placed so that the letter which defines the font shift fit the tick mark. This option is available only if you have activated font shift option. |
|
|
This panel is displayed only if the option horizontal text positioning
is chosen for the texts placed on the left or right.
Above: The text is placed so that the top of its highest letter fits the tick mark. |
|
|
|
|
|
Centered: The text is placed so that its center fits the tick mark. |
|
|
|
|
|
Below: The text is placed so that its baseline fits the tick mark. |
|
|